Categories: Featured Articles » Novice electricians
Number of views: 205275
Comments on the article: 9
About LEDs for Dummies
 I don't really like formulas. Like any normal person :) They cause me a headache and a desire to throw something into the wall. All my life I tried to stay away from them. And it turned out. But now I became interested in LEDs and realized - there’s no getting anywhere. To get the desired result, you need to understand how it works. Slowly, along the steps, I began to wade through the jungle of lumen, candela, and steradian. Gradually, a picture began to form in my head. And at the same time regret - well, why was there no one to explain it in a simple accessible language? So much time wasted ... I'll try to save you from a headache and explain it as accessible as possible - what is an LED and how does it work. Well, at the same time I’ll explain a couple of laws of optics :)
The article is dedicated to those who get confused in watts-candela-lumens-suites. And indeed in LEDs. Written by an advanced teapot for beginners :)
Regular LED
 No matter how you rotate, you will first have to touch on the laws of ordinary electricity. In illustrative examples, of course :) We all know - what is 220 volts - this is what can hit properly, if you do not observe safety precautions. When you buy an electric appliance, for example, an iron, the passport says what voltage it is designed for. Usually this is 220 volts. But in the same passport these parameters are also indicated - an alternating voltage with a frequency of 50 hertz. Why do manufacturers stubbornly indicate these parameters for you?
Pick up any technical passport for an electric appliance and look - it says that the supply voltage should be ~ 220 volts, 50 Hz. Let's see what it is. A “~” indicates that the voltage must be variable. In an automotive electrical system, for example, the voltage is constant. And with a finger-type battery it’s permanent. The difference is simple - a constant voltage has a plus and a minus - a variable does not. Why not ? Everything is very simple. In AC networks, plus and minus are constantly changing places. The same contact is either a plus or a minus. How often ? But for this, there is another value - 50 Hz.
What is Hz? This is one wobble per second. That is, in our home network, plus changes minus fifty times per second. And now - what is the practical use of this knowledge, what kind of bearing does it have on the LED?
Let's get it right. Suppose you have a 220 volt 100 watt bulb in your hands. If you plug it into an electrical network - it will light up for all its one hundred watts. And if we do not need these 100 watts? Do you need, say, 50? This will help us DIODE.
If we break the word “LED” into its components, we get “light” and “diode”. That is, this is a regular diode, which also glows.
A diode is a device that is best compared, for example, with a valve or nipple in a car wheel. There you can pump air, and back - the nipple does not let. An ordinary diode looks like a black barrel with two pins - plus and minus. Here we can use it for practical experiments that help many to fix the material. Of course, it is dangerous to start experiments immediately with 220 volts, but with proper care nothing bad will happen. Nevertheless, all the experiments you conduct at your own peril and risk :)
Look on the topic: The device and principle of operation of a semiconductor diode
We need a light bulb from the refrigerator for 220v, 15 watts. For her, you need to find a suitable cartridge and remove two wires from it. Then we need any diode that can be obtained, for example, from any faulty TV or tape recorder. The larger it is, the better. You don’t need to take very small ones - 220 volts after all. Near it there is usually a designation in the form of a triangle.
Then we need a power cord with a plug, some wires and soldering iron. To get started, simply connect the light bulb to the network and remember how it glows. Then disconnect and assemble the circuit as shown on the left.

Do not forget to carefully insulate all joints with electrical tape. Plug in. As you can see, the light bulb shines much worse. This is not surprising - she now receives only half of the voltage she needs - the second diode does not start up. If your experience was a success, and the diode is large enough - you can now make any of your bulbs practically eternal.
For example, a 50-watt lamp shines in your hallway and constantly burns out. Take 100 watts, turn it on through the diode - it will shine like 50 watts, but it will not burn out. There is, however, one caveat - the diode must be rated for 220V and the current is at least amperes. It’s best to buy one at a radio parts store.
Well, since we figured out what a diode is, it makes sense to go to the topic of interest to us - the LED. The LED, as it is now clear, also has a plus and a minus. That is, for its operation, a constant voltage source is needed - a battery, a battery, a power supply. The power supply must indicate that it is supplying constant voltage (DC). Usually on the cover of the block there is a sticker of this content.
Input - ~ 220V 50HZ,
output - 12v, 0.5 A DC
This means that such a unit can produce a constant voltage of 12 volts and a current of 0.5 amperes.
Note that the charger for cell phones is also a power supply. It usually has parameters of 5-6 volts, 0.2-0.5 A. It is often very convenient to use it to power the LEDs, because Charger stabilizes the current. But more about this later in the following articles.
Two parameters are important to us - the operating voltage of the LED and the current. The operating voltage of the LED is also called "voltage drop". In essence, this term means that after the LED, the voltage in the circuit will be less by the size of this same drop. That is, if we supply power to the LED, which has a voltage drop of 3 volts, then it will eat these three volts, and the device connected to it after this will get 3 volts less. But the most important thing to learn is that the current is important to the LED, not the voltage. He will take the voltage as much as he needs, but the current - how much you give. That is, if your power source can give out 10 amperes, the LED will take current until it burns out. The logic here is simple - the connected LED consumes current and starts to warm up. The stronger it heats up - the more current can pass through it - it expands from heating. Together with the current, the voltage drop across the diode increases. And so until it burns out completely - no one has limited the current. But this must be done, using the limiting element.
Note that if the power source has an output voltage equal to the operating voltage of the LED, it is not necessary to limit the current. That is, if you have, for example, a white LED and a 3.6 volt battery from a cell phone - you can connect it directly to this battery - nothing will happen to the LED. He would be happy to grab more current - but there is not enough voltage. So the 3.6 V cell battery is an ideal power source for experimenting with white and blue LEDs. Why only with them - about this in other articles.
In general, in series with the LED, we need to put a kind of tap and screw it to the value we need. In the role of such a crane can be different devices. The simplest of them is a resistor.
Optical aspects of using LEDs
 Suppose we learned how to connect an LED and limit its current. The question arises - how much does it shine? Here we have to plunge a little into optics.
Among the properties of LEDs, especially powerful ones, the type of light distribution is often indicated. Usually this is the so-called Lambert LED. Further we will consider it as the most widespread. What does this term mean? The "Lambert" LED shines in all directions equally, regardless of direction.If the LED was a ball, it would shine equally in all directions - this is the essence of the Lambert diagram. To make it clear, the sun is a Lambertian source.
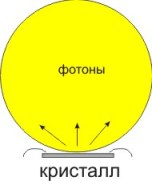
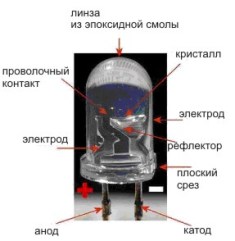
The standard LED design is a crystal, a thin plate that glows. Look through the transparent window of the LED - and you will see this crystal. Thin wires of contacts come to him. If you connect the imagination, you can imagine the light coming from the LED as a sphere-shaped cloud hanging above it. Light - these are small particles called photons. So, a ball filled with photons hangs above the LED. And the more light the LED emits, the larger the ball, the farther the photon donuts fly, pushing and crowding each other out. Most of them fly upward perpendicular to the plane of the crystal, so the maximum light intensity of LEDs is 90 degrees relative to the plane of the crystal. I hope that now the diagrams given by the LED manufacturers have become clearer to you :) To become completely understandable, let's look at an example.
Let's assume that there is an LED, at the top of which a light sphere emitted by it hangs with a diameter of 1 meter (good LED! :)).
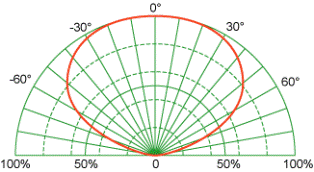
The lower scale is the number of percent of this meter, the upper is the degree of radiation. In accordance with this diagram, the largest number of photons is at the highest point with a degree of 0 and a range of 1 meter. It looks weird, but it is. Less strange it starts to look, if you remember that light is a wave, it is not for nothing that they indicate the wavelength for the characteristics. Accordingly, our light sphere can be represented as an electromagnetic field with a certain density. But this is already a jungle - let's move on :)
Half brightness angle
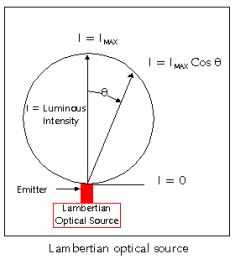
The manufacturer usually indicates a parameter such as a double angle of half brightness. What does this term mean? As we found out, the LED gives maximum light in the center and at the top, that is, the angle is zero. Accordingly, the farther from the center, the less light. The half brightness angle is when the LED gives 100 conventional units of light at “0” degrees, and, for example, at 30 degrees (relative to the “0” axis) - 50. The half brightness angle in Figure I is the light intensity, Imax is the maximum light intensity. ImaxCos - half the power of light. Why "double" - we multiply degrees by two, the LED also shines symmetrically. As a result, we get a nice isosceles triangle of light. There is also light outside this triangle, we have a ball of light, but the reference point for the characteristic of the LED is half the angle.
Candela
Now we can consider what Candela is. Candela is, in the old way, a "candle." Remember, they used to say - a chandelier or a lamp with a hundred candles? In the old days, some kind of reference point was needed. We agreed to take a candle of the required thickness, light it and consider it a standard, this very candela. Nowadays, of course, they think differently. I will not explain in detail how, this is beyond the scope of the article. It’s just a unit of measure for luminous intensity, and it’s called Candela. Its main feature is the use of directional sources for measuring light intensity. That's why for 5 mm LEDs the values are indicated in candels, more precisely, millicandels (1 cd = 1000 mcd).
It's time to figure out how 5 mm LEDs or any other in a plastic case differ from powerful ones.
Design features of indicator 5 mm LEDs
As mentioned above, an LED is a light emitting crystal. Consider the design of the LED in a 5 mm plastic case. A close examination reveals two important things - the lens and the reflector. The LED crystal is placed in the reflector device of the LED. This reflector sets the initial scattering angle. Then light passes through an epoxy casing. It comes to the lens - and then begins to dissipate on the sides at an angle depending on the design of the lens. In practice - from 5 to the LED diagram 160 degrees.
To indicate the luminous intensity of such LEDs, just candela is used.LEDs with directional emission emit light in a solid angle. To understand what a solid angle is, it is enough to imagine the following picture. You take a flashlight, turn it on and put it in the fire bucket to the very bottom, then close it with a lid. The light inside, accordingly, has the form of a cone in the shape of our bucket. This cone bounded by a lid is a solid angle.
I’ll try to explain the meaning of light distribution more simply. Let's say the luminous intensity of our lantern is 1 candela, that is, 1000 microchandels (to be more figurative, we can consider microchandels as photons :)) If we go further by analogy, we have a full bucket of microchandels. If you wish, you can calculate the volume of the bucket - welcome to the geometry :) Accordingly, if we take the bucket twice as much - the microchandels are evenly distributed on it, that is, there will be no more :) In all these explanations, you can find the answer to the sacred question - how many LEDs are needed to replace a 100-watt bulb. About it - further.
Design Features of High Power LEDs
Unlike indicator LEDs, powerful ones are not only a device, but also a marketing product. Today, between major manufacturers, there is a real race for lumens - who is more? And nobody cares that these lumens must still be used. Let's go in order.
The main difference between a powerful LED and an indicator LED in its pure form is to minimize any obstacles to the exit of light from the LED housing. Therefore, powerful LEDs have a Lambert diagram. What does this lead to in practice? You turn on the LED and get a nice light bulb above it. And what to do next? How can they illuminate the surface you need? You have to use various optics or reflectors, which inevitably leads to losses, and therefore a decrease in luminous flux. Therefore, if, having bought a powerful LED, you have not acquired good optics, and designed specifically for its design - you rejoice early - the headache is yet to come.
Delivering the lumens you need to the surface you want to light is not an easy task.
Lumen
As you already understood, candelas for evaluating the luminous intensity of high-power LEDs are not suitable. To do this, there are lumens - this is the total amount of light that the LED can give when connected with the specified current and voltage values. Remember the fire bucket analogy? Here she also fits. We assume that if the LED has a light intensity of 100 lumens, then in our bucket there will be 100 lumens.
A 100 W ordinary light bulb is also a Lambert source. The average light output of this bulb is 10-15 lumens per watt. That is, 100 watts of incandescent light will give us, say, 1000 lumens. So, to replace a 100-watt lamp with LEDs, you need 10 pieces of 100 lumens each. Is it that simple? No Unfortunately. We come to a term such as LUX.
Suite
Luxury is the ratio of the number of lumens and the illuminated area. 1 lux is 1 lumen per square meter. Let's say we have a square surface with an area of one meter. All of it is evenly lit by a bulb located at a certain distance sheer from above. For this light bulb, the manufacturer declared an illumination of 100 lux. We take a device that measures the power of light and measure it anywhere in our square, we should get 100 lumens. If so, the manufacturer did not deceive us.
Read also on this topic:LED usage examples
See also at bgv.electricianexp.com
:
