Categories: Sharing experience, Electrical Reviews
Number of views: 37167
Comments on the article: 1
The use of threaded rivets in the installation of control cabinets
 When mounting electrical cabinets, sometimes you have to mount rather massive components on the mounting panel that cannot be fastened tightly, because they need to be removed from time to time for various reasons - for replacement, for maintenance, etc., for example, electricity meters (meters ), frequency drives, etc. Usually they are fixed with screws.
For this, it is necessary to provide threaded holes in the mounting panel so that when they are removed, the entire panel in the mounted cabinet must not be removed in order to get the fixing nuts from the back of the panel.
With their small diameters, a panel made of a thin sheet is enough to bulge and cut the M3, M4 thread into them, but for greater bearing capacity with the M5, M6 threads this way you can’t do, because you cannot make such a thread in a thin sheet of a panel. It is necessary to put threaded bushings in these places. In the old days, they were produced by domestic industry, now all my reserves are exhausted and you will not find them in the afternoon with fire.
On the next trip, the store in the fastener department came across threaded rivets. This is an excellent way out, as they are quite affordable and quite cheap. However, the question arose about their installation. I rummaged in the internet, looked what tool is needed for this. This was not the case in the city, and its price turned out to be healthy. I had to turn on my head and think how to do it in an affordable way. In the course of thought, this article was born. I think that it will be useful to a large number of do-it-yourselfers and even pros.
Subtleties of working with a threaded rivet
 The threaded rivet, in contrast to the usual one, not only connects sheet materials to each other, but is also equipped with an internal screw thread. Therefore, such a rivet can be used in relatively thin-sheet constructions that require strong threads for subsequent use. The main advantages of such fasteners are the ease of installation, the absence of deformation and discoloration of the workpiece material.
High-quality threaded rivets can be installed in hard-to-reach places using simple equipment (mechanical or pneumohydraulic riveters) and without preliminary surface preparation. When choosing the right rivet, it is necessary to take into account the type and thickness of the material being joined, as well as the type of tool that will be used to set the rivet.
 An important parameter determining the durability of the fastening of the workpieces is the external diameter of the threaded rivet. The higher the value of this parameter, the more reliable the connection will be, and therefore, the greater the load can be experienced by the structure during operation.
In the case of installation with a hand tool, a threaded rivet can exert considerable resistance, and the thickness of its walls can greatly affect the usability. However, regardless of the type of tool used, wall thickness, the presence or absence of corrugation directly affects the strength of the nut rivet. Another important characteristic of a rivet is its length.
The length of the threaded rivets must be selected according to the thickness of the fastened parts. However, in any case, such fasteners are designed to work with sheets with a thickness of 0.3-6 mm. Today, fastener blind rivets with various types of heads are presented on the fastener market, among them are countersunk heads, which ensure a smooth surface of the attached sheet.
Installation process:
1) the rivet is screwed onto the threaded rod of the tool;
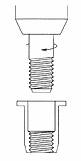
2) is inserted into the prepared hole until it stops;
3) the tool, resting on the rivet and pulling the rod, “rivets” it;
4) the threaded rod of the tool is unscrewed from the installed rivet.
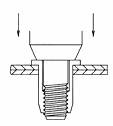
P.S.** During the operational review of the rivet installation technology, I found that there was no need to purchase a special expensive tool for installing threaded rivets. In my arsenal there is a universal tool - a screwdriver, with which you can easily install threaded rivets into the sheet.
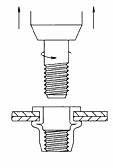
The essence of the method is as follows. Any riveter for installing threaded rivets upsets it and it acquires a side of a deformed metal, like any exhaust one, when the riveter with great effort pulls a threaded rod (rod) screwed into the rivet (see step 3 of the installation process). In this case, the stud only experiences translational movement. This can be achieved using a conventional screwdriver if an elongated nut is clamped in its chuck (see Fig. 1, Fig. 2).

Fig. 1

Fig.2
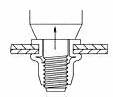
When the cartridge rotates, the nut, turning on the stud, forces it to compress the rivet with force along its axis. This leads to its expansion and fixing in the hole of the sheet. The long end of the stud must be kept from turning. For this, it is convenient to bend it at an angle of 90 ° (see Fig. 3).

Fig.3
After installing the rivet, the stud can be turned out.
This method has a drawback - it is impossible to install a rivet in a sheet without two-sided access, but in everyday life it is often not needed.
See also at bgv.electricianexp.com
: